Vorlage:Grid/Centrifuge: Unterschied zwischen den Versionen
(Die Seite wurde neu angelegt: „<includeonly><div style="float:{{#if:{{{float|}}}|{{{float}}}|left}};"><div style="left:0px; top:0px; width:352px; height:158px; position:relative;"> <div sty…“) |
|||
| (Eine dazwischenliegende Version desselben Benutzers wird nicht angezeigt) | |||
| Zeile 2: | Zeile 2: | ||
<div style="left:0px; top:0px; width:352px; height:158px;">[[Image:GUI_Centrifuge.png|284px|link=Centrifuge|alt=Centrifuge]]</div><!-- | <div style="left:0px; top:0px; width:352px; height:158px;">[[Image:GUI_Centrifuge.png|284px|link=Centrifuge|alt=Centrifuge]]</div><!-- | ||
| − | -->{{#if:{{{Input|}}}|<div style="left:29px; top: | + | -->{{#if:{{{Input|}}}|<div style="left:29px; top:70px; width:32px; height:32px; position:absolute;"> |
[[Image:{{#if:{{{Input-image|}}}|{{{Input-image}}}|Grid_{{{Input|}}}.png}}|32px|link={{#if:{{{Input-link|}}}|{{{Input-link}}}|{{{Input}}}}}|alt={{{Input}}}]] | [[Image:{{#if:{{{Input-image|}}}|{{{Input-image}}}|Grid_{{{Input|}}}.png}}|32px|link={{#if:{{{Input-link|}}}|{{{Input-link}}}|{{{Input}}}}}|alt={{{Input}}}]] | ||
</div>}}<!-- | </div>}}<!-- | ||
| − | -->{{#if:{{{A1|}}}|<div class="cgrid" style="left:157px; top: | + | -->{{#if:{{{A1|}}}|<div class="cgrid" style="left:157px; top:34px; width:32px; height:32px; position:absolute;"> |
| − | [[Image:{{#if:{{{A1-image|}}}|{{{A1-image}}}|Grid_{{{A1}}}.png}}|32px|link={{#if:{{{A1-link|}}}|{{{A1-link}}}|{{{A1}}}}}|alt={{{A1}}}]]{{#if:{{{A1-chance|}}}|<span> | + | [[Image:{{#if:{{{A1-image|}}}|{{{A1-image}}}|Grid_{{{A1}}}.png}}|32px|link={{#if:{{{A1-link|}}}|{{{A1-link}}}|{{{A1}}}}}|alt={{{A1}}}]]{{#if:{{{A1-chance|}}}|<span>{{{A1-chance}}}%</span>}} |
</div>}}<!-- | </div>}}<!-- | ||
| − | -->{{#if:{{{A2|}}}|<div class="cgrid" style="left:193px; top: | + | -->{{#if:{{{A2|}}}|<div class="cgrid" style="left:193px; top:34px; width:32px; height:32px; position:absolute;"> |
| − | [[Image:{{#if:{{{A2-image|}}}|{{{A2-image}}}|Grid_{{{A2}}}.png}}|32px|link={{#if:{{{A2-link|}}}|{{{A2-link}}}|{{{A2}}}}}|alt={{{A2}}}]]{{#if:{{{A2-chance|}}}|<span> | + | [[Image:{{#if:{{{A2-image|}}}|{{{A2-image}}}|Grid_{{{A2}}}.png}}|32px|link={{#if:{{{A2-link|}}}|{{{A2-link}}}|{{{A2}}}}}|alt={{{A2}}}]]{{#if:{{{A2-chance|}}}|<span>{{{A2-chance}}}%</span>}} |
</div>}}<!-- | </div>}}<!-- | ||
| − | -->{{#if:{{{A3|}}}|<div class="cgrid" style="left:229px; top: | + | -->{{#if:{{{A3|}}}|<div class="cgrid" style="left:229px; top:34px; width:32px; height:32px; position:absolute;"> |
| − | [[Image:{{#if:{{{A3-image|}}}|{{{A3-image}}}|Grid_{{{A3}}}.png}}|32px|link={{#if:{{{A3-link|}}}|{{{A3-link}}}|{{{A3}}}}}|alt={{{A3}}}]]{{#if:{{{A3-chance|}}}|<span> | + | [[Image:{{#if:{{{A3-image|}}}|{{{A3-image}}}|Grid_{{{A3}}}.png}}|32px|link={{#if:{{{A3-link|}}}|{{{A3-link}}}|{{{A3}}}}}|alt={{{A3}}}]]{{#if:{{{A3-chance|}}}|<span>{{{A3-chance}}}%</span>}} |
</div>}}<!-- | </div>}}<!-- | ||
| − | -->{{#if:{{{B1|}}}|<div class="cgrid" style="left:157px; top: | + | -->{{#if:{{{B1|}}}|<div class="cgrid" style="left:157px; top:70px; width:32px; height:32px; position:absolute;"> |
| − | [[Image:{{#if:{{{B1-image|}}}|{{{B1-image}}}|Grid_{{{B1}}}.png}}|32px|link={{#if:{{{B1-link|}}}|{{{B1-link}}}|{{{B1}}}}}|alt={{{B1}}}]]{{#if:{{{B1-chance|}}}|<span> | + | [[Image:{{#if:{{{B1-image|}}}|{{{B1-image}}}|Grid_{{{B1}}}.png}}|32px|link={{#if:{{{B1-link|}}}|{{{B1-link}}}|{{{B1}}}}}|alt={{{B1}}}]]{{#if:{{{B1-chance|}}}|<span>{{{B1-chance}}}%</span>}} |
</div>}}<!-- | </div>}}<!-- | ||
| − | -->{{#if:{{{B2|}}}|<div class="cgrid" style="left:193px; top: | + | -->{{#if:{{{B2|}}}|<div class="cgrid" style="left:193px; top:70px; width:32px; height:32px; position:absolute;"> |
| − | [[Image:{{#if:{{{B2-image|}}}|{{{B2-image}}}|Grid_{{{B2}}}.png}}|32px|link={{#if:{{{B2-link|}}}|{{{B2-link}}}|{{{B2}}}}}|alt={{{B2}}}]]{{#if:{{{B2-chance|}}}|<span> | + | [[Image:{{#if:{{{B2-image|}}}|{{{B2-image}}}|Grid_{{{B2}}}.png}}|32px|link={{#if:{{{B2-link|}}}|{{{B2-link}}}|{{{B2}}}}}|alt={{{B2}}}]]{{#if:{{{B2-chance|}}}|<span>{{{B2-chance}}}%</span>}} |
</div>}}<!-- | </div>}}<!-- | ||
| − | -->{{#if:{{{B3|}}}|<div class="cgrid" style="left:229px; top: | + | -->{{#if:{{{B3|}}}|<div class="cgrid" style="left:229px; top:70px; width:32px; height:32px; position:absolute;"> |
| − | [[Image:{{#if:{{{B3-image|}}}|{{{B3-image}}}|Grid_{{{B3}}}.png}}|32px|link={{#if:{{{B3-link|}}}|{{{B3-link}}}|{{{B3}}}}}|alt={{{B3}}}]]{{#if:{{{B3-chance|}}}|<span> | + | [[Image:{{#if:{{{B3-image|}}}|{{{B3-image}}}|Grid_{{{B3}}}.png}}|32px|link={{#if:{{{B3-link|}}}|{{{B3-link}}}|{{{B3}}}}}|alt={{{B3}}}]]{{#if:{{{B3-chance|}}}|<span>{{{B3-chance}}}%</span>}} |
</div>}}<!-- | </div>}}<!-- | ||
| − | -->{{#if:{{{C1|}}}|<div class="cgrid" style="left:157px; top: | + | -->{{#if:{{{C1|}}}|<div class="cgrid" style="left:157px; top:106px; width:32px; height:32px; position:absolute;"> |
| − | [[Image:{{#if:{{{C1-image|}}}|{{{C1-image}}}|Grid_{{{C1}}}.png}}|32px|link={{#if:{{{C1-link|}}}|{{{C1-link}}}|{{{C1}}}}}|alt={{{C1}}}]]{{#if:{{{C1-chance|}}}|<span> | + | [[Image:{{#if:{{{C1-image|}}}|{{{C1-image}}}|Grid_{{{C1}}}.png}}|32px|link={{#if:{{{C1-link|}}}|{{{C1-link}}}|{{{C1}}}}}|alt={{{C1}}}]]{{#if:{{{C1-chance|}}}|<span>{{{C1-chance}}}%</span>}} |
</div>}}<!-- | </div>}}<!-- | ||
| − | -->{{#if:{{{C2|}}}|<div class="cgrid" style="left:193px; top: | + | -->{{#if:{{{C2|}}}|<div class="cgrid" style="left:193px; top:106px; width:32px; height:32px; position:absolute;"> |
| − | [[Image:{{#if:{{{C2-image|}}}|{{{C2-image}}}|Grid_{{{C2}}}.png}}|32px|link={{#if:{{{C2-link|}}}|{{{C2-link}}}|{{{C2}}}}}|alt={{{C2}}}]]{{#if:{{{C2-chance|}}}|<span> | + | [[Image:{{#if:{{{C2-image|}}}|{{{C2-image}}}|Grid_{{{C2}}}.png}}|32px|link={{#if:{{{C2-link|}}}|{{{C2-link}}}|{{{C2}}}}}|alt={{{C2}}}]]{{#if:{{{C2-chance|}}}|<span>{{{C2-chance}}}%</span>}} |
</div>}}<!-- | </div>}}<!-- | ||
| − | -->{{#if:{{{C3|}}}|<div class="cgrid" style="left:229px; top: | + | -->{{#if:{{{C3|}}}|<div class="cgrid" style="left:229px; top:106px; width:32px; height:32px; position:absolute;"> |
| − | [[Image:{{#if:{{{C3-image|}}}|{{{C3-image}}}|Grid_{{{C3}}}.png}}|32px|link={{#if:{{{C3-link|}}}|{{{C3-link}}}|{{{C3}}}}}|alt={{{C3}}}]]{{#if:{{{C3-chance|}}}|<span> | + | [[Image:{{#if:{{{C3-image|}}}|{{{C3-image}}}|Grid_{{{C3}}}.png}}|32px|link={{#if:{{{C3-link|}}}|{{{C3-link}}}|{{{C3}}}}}|alt={{{C3}}}]]{{#if:{{{C3-chance|}}}|<span>{{{C3-chance}}}%</span>}} |
</div>}}<!-- | </div>}}<!-- | ||
Aktuelle Version vom 2. Oktober 2013, 12:31 Uhr
- Description
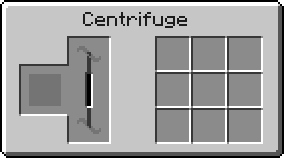
- This template is used to create a grid that looks similar to the Centrifuge's GUI screen.
- To use it, copy-paste the following code and fill in the parameters as described below.
{{Grid/Centrifuge
|Input=
|A1= |A1-chance= |A2= |A2-chance= |A3= |A3-chance=
|B1= |B1-chance= |B2= |B2-chance= |B3= |B3-chance=
|C1= |C1-chance= |C2= |C2-chance= |C3= |C3-chance=
}}
- Sample Output
{{Grid/Centrifuge
|Input= Honey Comb
|A1= Honey Drop
|A1-chance= 90
|A2= Beeswax
|A2-chance= 100
}}
- produces
[[Image:{{#if:|{{{Input-image}}}|Grid_Honey Comb.png}}|32px|link={{#if:|{{{Input-link}}}|Honey Comb}}|alt=Honey Comb]]
[[Image:{{#if:|{{{A1-image}}}|Grid_Honey Drop.png}}|32px|link={{#if:|{{{A1-link}}}|Honey Drop}}|alt=Honey Drop]]{{#if:90|90%}}
[[Image:{{#if:|{{{A2-image}}}|Grid_Beeswax.png}}|32px|link={{#if:|{{{A2-link}}}|Beeswax}}|alt=Beeswax]]{{#if:100|100%}}
[[Image:{{#if:|{{{A3-image}}}|Grid_{{{A3}}}.png}}|32px|link={{#if:|{{{A3-link}}}|{{{A3}}}}}|alt={{{A3}}}]]{{#if:|{{{A3-chance}}}%}}
[[Image:{{#if:|{{{B1-image}}}|Grid_{{{B1}}}.png}}|32px|link={{#if:|{{{B1-link}}}|{{{B1}}}}}|alt={{{B1}}}]]{{#if:|{{{B1-chance}}}%}}
[[Image:{{#if:|{{{B2-image}}}|Grid_{{{B2}}}.png}}|32px|link={{#if:|{{{B2-link}}}|{{{B2}}}}}|alt={{{B2}}}]]{{#if:|{{{B2-chance}}}%}}
[[Image:{{#if:|{{{B3-image}}}|Grid_{{{B3}}}.png}}|32px|link={{#if:|{{{B3-link}}}|{{{B3}}}}}|alt={{{B3}}}]]{{#if:|{{{B3-chance}}}%}}
[[Image:{{#if:|{{{C1-image}}}|Grid_{{{C1}}}.png}}|32px|link={{#if:|{{{C1-link}}}|{{{C1}}}}}|alt={{{C1}}}]]{{#if:|{{{C1-chance}}}%}}
[[Image:{{#if:|{{{C2-image}}}|Grid_{{{C2}}}.png}}|32px|link={{#if:|{{{C2-link}}}|{{{C2}}}}}|alt={{{C2}}}]]{{#if:|{{{C2-chance}}}%}}
[[Image:{{#if:|{{{C3-image}}}|Grid_{{{C3}}}.png}}|32px|link={{#if:|{{{C3-link}}}|{{{C3}}}}}|alt={{{C3}}}]]{{#if:|{{{C3-chance}}}%}}
}}
Notes[Bearbeiten]
Parameters[Bearbeiten]
Input Parameter[Bearbeiten]
|Input
- The "Input" parameter allows you to specify the name of the inserted item/block shown to the left side of the Centrifuge.
Output Grid Parameters[Bearbeiten]
Filling in the parameters A1 to C3 will automatically insert an image of the specified item that links to the corresponding page. They are set in the following formation:
  A1,B1,C1
  A2,B2,C2
  A3,B3,C3
Chance Parameters[Bearbeiten]
|A1-chance, |A2-chance, ..., |C3-chance
- Filling in the parameters A1-chance to C3-chance will add a box that will appear when hovering over a grid image. It will show the chance of getting said item when centrifuged.
- The % sign is added automatically and does not need to be inserted manually.
Additional Parameters[Bearbeiten]
- Custom links
|A1-link, |A2-Link, ..., |C3-link
- Each item can have a custom link by setting the "-link" parameter.
- For Example: A2-link would set a custom link for item A2.
- This is only necessary if a page link somehow deviates from the corresponding item/block name.
- If this parameter is omitted, the template will attempt to use [[item]]. For Example: If C2 was "Generator", then the image would try to link to [[Generator]].
- Custom images
|A1-image, |A2-image, ..., |C3-image
- Each item can have a custom image by setting the "-image" parameter.
- For Example: A2-image would set a custom image for item A2.
- This is only necessary if an image name somehow deviates from the actual item/block name.
- If this parameter is omitted, the template will attempt to use "Grid {{{item}}}.png". For Example: If C2 was "Generator", then the default image would be "Grid Generator.png".
Image requirements[Bearbeiten]
Images for this and other grid templates have to be 32x32 pixels in size and prefixed with "Grid". Please refer to the Style Guide for further information.